Reset Catalyst Switches Running CatOS
This procedure applies to Catalyst 4500/4000, 5500/5000, and 6500/6000 series switches running CatOS. These switches store the configuration in NVRAM automatically, wherever users enter the commands in enable mode. On Cisco IOS Software, you must save the configuration with the command or the copy running-config startup-config command. You can reset the system or module configuration on these switches running CatOS to factory defaults with the clear config command. The command syntax is:
The clear config all command clears the system configuration, as well as the module configuration. This command does not, however, clear the boot variables, such as config-register and boot system settings. You can alter the boot variable settings with the set boot command. If your switch has any router cards, the clear config all command does not clear the Cisco IOS Software configuration on the router cards. (Examples of these router cards include WS-X4232-L3 modules on the 4000 switches, Route Switch Modules /Route Switch Feature Cards on the 5500/5000 switches, or the Multilayer Switch Modules /Multilayer Switch Feature Cards on the 6500/6000 switches.) To clear the configuration on router cards, you can access the router card with the session command. Then, reset the switch to factory defaults with use of the procedure in the section of this document. This example shows how to reset the configuration on the switch to factory defaults:
After the configuration erase in CatOS, you do not need to reload the switch. The configuration takes effect immediately, and the switch returns to the factory default configuration. If you want to clear the configuration of a specific module on the switch, issue the clear config mod command, as shown here:
Reset Catalyst Switches in Redundant Mode
For the 6500/6000 and 5500/5000 switches which run CatOS in redundant mode, the standby Supervisor Engine synchronizes with changes made to the active Supervisor Engine.
So, if you reset the configuration on the active Supervisor Engine to factory defaults with thecommand, the standby Supervisor Engine also resets to factory defaults.
Whether you set the configuration mode to binary or text mode with the command, the switch resets to factory defaults when you clear the configuration on the active Supervisor Engine.
To reset 6500/6000 switches which run Cisco IOS Software in redundant mode to factory defaults, you need to complete these steps:
-
Erase the startup configuration with thecommand on the active Supervisor Engine. This also erases the startup configuration on the standby Supervisor Engine.
-
Delete the vlan.dat file as shown in thesection of this document.
-
Reload the active Supervisor Engine with the command
If the Supervisor Engine enters the ROMmon mode after it reloads, check the boot variable to see if it is set to boot from the proper image.
Refer also to the documentRecover a Catalyst 6500/6000 Running Cisco IOS System Software from a Corrupted or Missing Boot Loader Image or ROMmon Modefor further information.
Resetting Cisco 7940, 7960 IP Phones
(examples here)
- Pull the network cord out of the phone and plug it back in (physically resetting the unit)
- Immediately press and hold the # key and while the Headset, Mute, and Speaker buttons begin to flash in sequence, release the # key.
- Press 123456789*0# after the Headset, Mute, and Speaker buttons begin to flash (you only have 60 seconds to do this, then it goes back to normal booting).
- If you enter this key sequence correctly, the phone will display this prompt: Keep network cfg? 1 = yes 2 = no By pressing 1 you will preserve the current network config (think tftp server settins, etc). Pressing 2 will blast everything away.
Manually Reset the Switch
When the switch fails to work and cannot be reset by using the web-based utility, the switch can be manually reset to restore the factory default configuration.
Step 1. Disconnect all Ethernet cables from the switch.
Step 2. Using a pin, press and hold the Reset button on the switch for 15 to 20 seconds.
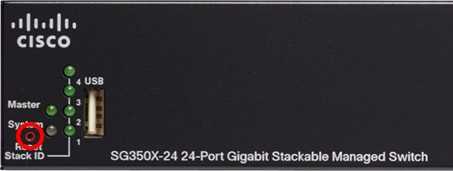 In this example, SG350X-24 24-Port Gigabit Stackable Managed Switch is used.
Step 3. Once all the port Light-Emitting Diodes (LEDs) light up, release the Reset button.
Telnet and SSH services are disabled by default. You will have to access the console of the switch using the computer that is directly connected to your switch through the serial cable.
Step 4. Connect your computer directly to the switch using a serial cable.
Step 5. Log in to the switch console. The default username and password is cisco/cisco.
Step 6. You will be prompted to configure new password for better protection of your network. Press Y for Yes or N for No on your keyboard.
 In this example, Y is pressed. If N is pressed, skip to .
Step 7. (Optional) Enter the old password then press Enter on your keyboard.

Step 8. (Optional) Enter and confirm the new password accordingly then press Enter on your keyboard.

Step 9. Enter the Global Configuration mode of the switch by entering the following:
SG350X#configure terminal
Step 10. (Optional) To change the hostname of your switch, enter the following:
SG350X(config)#hostname In this example, SG350X is used.
Step 11. (Optional) To enable the Telnet service on your switch, enter the following command:
SG350X(config)#ip telnet server
Step 12. (Optional) To enable the SSH service on your switch, enter the following command:
SG350X(config)#ip ssh server
Factory Reset on Cisco Router or Switch IOS
The following procedure is the steps when we are going to factory reset a Cisco router.
1. In the global configuration mode, create a hostname first on the router as we will use it for verification if the router is already reset into the factory settings.
Router(config)#hostname Router 1
2. Verify the configuration by using one of the following commands.
Router 1#sh running-config
Building configuration...
Current configuration: 526 bytes
!
version 15.1
no service timestamps log datetime msec
no service timestamps debug datetime msec
no service password-encryption
!
hostname Router 1
!
!
3. Save the configuration using the ‘copy running-config startup-config’ command.
Router 1#copy running-config startup-config
Router 1#write
4. Resetting the Cisco router to factory default involves erasing the NVRAM.
Router 1#write erase
Erasing the nvram filesystem will remove all configuration files!
Continue? y
Erase of nvram: complete
%SYS-7-NV_BLOCK_INIT: Initialized the geometry of nvram
5. Reload the Cisco router to complete resetting to the factory defaults, and the startup wizard or initial system configuration dialog will appear.
Router 1#reload
6. Verify if the Cisco router is reset to factory default by checking if “hostname Router 1” is disappeared and changed to default.
Router#sh running-config
Building configuration...
Current configuration: 584 bytes
!
version 15.1
no service timestamps log datetime msec
no service timestamps debug datetime msec
no service password-encryption
!
hostname Router
!
!
Password Recovery on Cisco IOS
Before we proceed with password recovery, we will take a look first at the configuration register. We can use the ‘show version’ command to check the configuration register setting on our device. Configuration Register is a special 16 bits value that can be configured in Cisco routers. It is mainly used to determine how the router boots, to determine boot options, and to set console speed. The following are the most commonly used configuration register settings:
- config-register 0x2102 – boot normally (default configuration register setting)
- config-register 0x2120 – boot into ROM Monitor (ROMMON)
- config-register 0x2142 – ignore contents of NVRAM (startup-configuration)
The following procedure is the steps when we are going to recover the forgotten enable password or enable secret command configured in our Cisco router or switch.
1. Power ON the router.
2. Press the break sequence (ctrl-Break) while the router is initializing to break into ROMMON prompt.
3. Follow this command, confreg 0x2142, to ignore the startup-configuration and reset or reload the router.
rommon 1 > confreg 0x2142
rommon 2 > reset
4. After reboot, it will not ask you the secret password and will proceed to the setup wizard or initial system configuration dialog, as it booted up with a blank configuration.
5. The startup-configuration is still there with the full configuration, including the unknown enable secret, but the router does not use it when it boots. Enter a new enable secret in global configuration mode to overwrite the old one. This will go into the running-config.
Router(config)#enable secret cisco12345
6. In the global configuration mode, configure the configuration register back to default by entering the ‘config-register 0x2102’ router command, so the router will boot normally on the next restart.
Router(config)#config-register 0x2102
7. Save the configuration. This will merge the new enable password into the existing startup-configuration.
Router#copy running-config startup-config
8. Reboot the router using the ‘reload’ command and see that the secret password is changed to the one we configured earlier.
Router#reload
Download our Free CCNA Study Guide PDF for complete notes on all the CCNA 200-301 exam topics in one book.
. It’s the highest rated Cisco course online with an average rating of 4.8 from over 30,000 public reviews and is the gold standard in CCNA training:
Reset Catalyst Switches in Redundant Mode
For the 6500/6000 and 5500/5000 switches running CatOS in redundant mode, the standby Supervisor Engine synchronizes with changes made to the active Supervisor Engine. So, if you reset the configuration on the active Supervisor Engine to factory defaults with the clear config command, the standby Supervisor Engine also resets to factory defaults. Whether you set the configuration mode to binary or text mode with the set config mode command, the switch resets to factory defaults when you clear the configuration on the active Supervisor Engine.
To reset 6500/6000 switches running Cisco IOS Software in redundant mode to factory defaults, you need to complete these steps:
-
Erase the startup configuration with the erase startup-config command on the active Supervisor Engine.
Note: This also erases the startup configuration on the standby Supervisor Engine.
-
Delete the vlan.dat file as shown in the section of this document.
-
Reload the active Supervisor Engine with the command
Note: If the Supervisor Engine enters the ROMmon mode after it reloads, check the boot variable to see if it is set to boot from the proper image. You may also refer to the document Recovering a Catalyst 6500/6000 Running Cisco IOS System Software from a Corrupted or Missing Boot Loader Image or ROMmon Mode for further troubleshooting information.
Objective
The Reboot feature of the network device is useful when certain changes in the settings require a reboot to completely apply the configuration settings, or if the device is not functioning as expected. The configuration settings of the network device get reflected after the device restarts.
The Reset feature is used to remove the running or current configuration settings on the network device and restore it to the original default settings. Manual reset is recommended when the whole device needs to be reconfigured, or in case you forget the password and not able to recover by any means such as accessing the console using Telnet or Command Line Interface (CLI).
This article provides instructions on how to manually reboot or reset your switch. If you would like to use the CLI for the reset, click here to access the CLI version.
Applicable Devices | Firmware Version
- Sx250 Series | 2.2.5.68 (Download latest)
- Sx300 Series | 1.4.7.05 (Download latest)
- Sx350 Series | 2.2.5.68 (Download latest)
- SG350X Series | 2.2.5.68 (Download latest)
- Sx550X Series | 2.2.5.68 (Download latest)
Background Information
This document describes situations where it is desirable to restore the Catalyst switch configuration to the original default factory settings.
This is useful when you want to remove an undesirable configuration that is present in the switch. If you have configured a switch and the configuration has become very complex or if you want to move a switch from one network to other, you can reset the switch to factory defaults and configure it as a new switch. This document provides information and sample command logs to reset your switches.
To reset the Catalyst switches to factory defaults, you need access to the switch console through either a physical console or a Telnet connection.
You also need the console/enable passwords. If you forget the console and enable password of your switch, you cannot reset the switch configuration to factory default to reset the password.
In this case, you need to do the steps in the password recovery procedure for your switch. Refer to this document for steps to recover the passwords on your Catalyst switches:
Password Recovery Procedures
Note: If you reset the switch to factory defaults while you access the switch by Telnet connection, you lose connectivity to the switch.
Manually Reload the Switch through the CLI
The available commands may vary depending on the exact model of your device. In this example, SG350X-48MP switch is used.
Step 1. Log in to the switch console. The default username and password is cisco/cisco. If you have configured a new username or password, enter the credentials instead.
In this example, the switch is accessed through SSH.
Important: When a switch is reloaded, the running configuration file is deleted. Before proceeding with the reload instructions, make sure to save all the running configuration settings to avoid data loss.
Step 2. In the Privileged EXEC mode of the switch, save the configured settings to the startup configuration file, by entering the following:
If you wish to proceed without saving the running configuration settings, skip to .
SG350X#copy running-config startup-config![]()
Step 3. Press Y for Yes or N for No on your keyboard once the Overwrite file … prompt appears.
 In this example, Y is pressed.
Step 4. To reload the switch, enter either of the following commands:
- reload — Use the reload command to reload the switch immediately.
- reload {{in hhh:mm | mmm | at hh:mm }} — Use this command to specify scheduled switch reload.
— in hhh:mm | mmm — Schedules a reload of the image to take effect in the specified minutes or hours and minutes. The reload must take place within approximately 24 days.
— at hh:mm — Schedules a reload of the image to take place at the specified time by using a 24-hour format. If you specify the month and day, the reload is scheduled to take place at the specified time and date. If you do not specify the month and day, the reload takes place at the specified time on the current day (if the specified time is later than the current time) or on the next day (if the specified time is earlier than the current time). Specifying 00:00 schedules the reload for midnight. The reload must take place within 24 hours.
This option can only be used if the system time settings of the switch have been configured. To learn how, click here for instructions.
— day — Number of the day in the range from 1 to 31.
— month — The month of the year in the range from Jan to Dec.
SG350X#reload at 10:00 11 Apr In this example, reload at 10:00 11 Apr is used.

Step 5. Press Y for Yes or N for No on your keyboard once the This command will reset the whole system and disconnect your current session prompt appears.
 In this example, Y is pressed.
Step 6. (Optional) To display information about a scheduled reload, enter the following:
SG350X#show reload
Step 7. (Optional) To cancel the scheduled reload, enter the reloadcancel command.
SG350X#reload cancel
You will be notified that the scheduled reload was aborted.

You should now have successfully reloaded your switch through the CLI.
In the example below, the immediate reload is used and Y is entered on both questions.

You have now successfully reset the switch manually. To learn how to assign an IP address on your switch through the CLI, click here.
If you want to perform the reset through the GUI, check out Reboot and Factory Default Reset on 300 Series Managed Switches.
Other articles on this topic:
- Access an SMB Switch CLI using SSH or Telnet
- Configure SSH Server Authentication Settings on a Switch through the CLI
- Configure Secure Shell (SSH) Server Authentication Settings on a Switch
- Configure Secure Shell (SSH) User Authentication Settings on a Switch
Manually Reboot the Switch
Important: When a switch is rebooted, the running configuration file is deleted. Before proceeding with the reboot instructions, make sure to save all the running configuration settings to avoid data loss. If you would like assistance with the reboot, check out the article Download or Back Up Configuration Files on a Switch.
Log in to the web-based utility of the switch and choose Administration > Reboot.
Step 2
In the Reboot area, click the radio button that corresponds to the desired time at which the switch reboots.
The options are:
Immediate — Switch reboots immediately once Reboot is clicked.
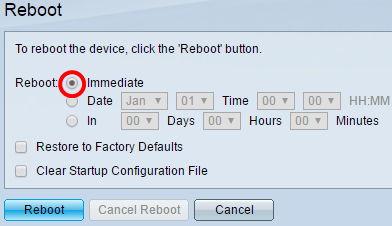
Date — Switch reboots on the configured date and time. Choose the month and date on which you want the switch to be rebooted and the specific time on that particular day to reboot the switch.

In — Switch reboots after the configured time has passed. Choose the number of days and hours the switch waits to reboot. Once that fixed time passes, the switch reboots.

Step 3
(Optional) Check the Restore to Factory Defaults check box to reboot the switch to the factory default configuration.
Step 4
(Optional) Check the Clear Startup Configuration File check box to clear the configuration on the switch after reboot.
Step 5
Reboot
Note: In this example, Immediate is chosen and Restore to Factory Defaults is checked.
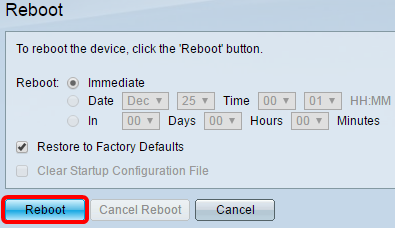
Note: DHCP Auto Configuration is enabled by default in the factory settings. In order to properly reboot the switch to factory defaults, you need to disable the DHCP Auto Configuration so the switch does not automatically download a configuration from a local server. To learn more about this feature, click here for instructions.
You have now successfully rebooted your switch.
Resetting Cisco 7941, 7942 7945, 7961, 7962, 7965, 7970, 7975 IP Phones
()Option 1
- Pull the network cord out of the phone and plug it back in (physically resetting the unit)
- Immediately press and hold the # key and while the Headset, Mute, and Speaker buttons begin to flash in sequence, release the # key (you may have to hold the # for 30 seconds).
- Press 123456789*0# after the line lights buttons will begin to flash in sequence (you only have 60 seconds to do this, then it goes back to normal booting).
- If you’ve done it right you’ll see the phrase “Upgrading”
Option 2 (if option 1 doesn’t work)
- Power off the phone (if using inline power, just remove the ethernet).
- Hold the # key down.
- Power on the phone while still holding down the # key.
- When the line buttons scroll down orange, you can take your finger off the hash button
- Press the following buttons: 3491672850*#
- The line buttons should continue to scroll, but now they should be red
- After about 60sec, this will change to green, and the phone should the boot up correctly
If that still did not work
If the above methods did not work then you’ll likely have to try something more drastic. This involves setting up a tftp server on your PC, and taking a look at what files the phone is actually asking for. I was forced to do this recently when a 7970 I had refused to boot. This 7970 had no display, and the only thing that it did was flash the line lights in sequence. The fix for this particular phone was to grab the oldest firmware available on cisco.com and provide that do the phone.
Setting up a local tftp server:
- Download a tftp server program to your computer. I personally like tftpd32
- Download some firmware for the phone from cisco.com. In my case I needed some older firware for the 7970, so I grabbed file cmterm-7970_7971-sccp.7-0-1.zip. You will want the “Firmware files only” option.
- Using a spare network switch, configure it for DHCP.
- Plug your computer into the switch, and allow it to obtain an IP address.
- Configure the DHCP option 150 on the network switch to point to your PC’s IP address.
- Start the tftp program on your PC
- Plug in the misbehaving phone.
- When looking in the log files of the tftp server, you should see the phone requesting files. You can see from the screenshot below that it was requesting the “term70.default.load” file, and not finding it.
- Now, unzip the firmware files you downloaded, put them in the tftp server’s root directory, and restart the tftp server
- Power cycle the phone, and you should see it come back and request (and find) several different firmware files
- Once it’s up and running, you should be able to put it on your production network and have it successfully upgrade to your production firmware version.
Cisco: резервное копирование конфигурации на tftp сервер
Для этого первым делом вам потребуется «поднять» на своей рабочей станции или выделенном сервере сервис TFTP. На ОС семейства Windows можно использовать такие решения, как tftpd32, Cisco TFTP Server или любое другое доступное ПО. На ОС семейства Linux обычно уже имеется готовый tftp-сервер tftpd, который необходимо настроить и прописать в автозагрузку. Если сервер вдруг окажется недоступным с оборудования Cisco, нужно будет проверить наличие маршрутизации к нему и добавить правило на фаерволе, открывающее порт udp 69 на ip-адрес сервера. Если данные действия не помогли, необходимо проверить ACL (Access control lists) на самом устройстве Cisco на предмет разрешения исходящих соединений, что случается довольно редко.
Итак, после выполнения всех рекомендаций, можно приступить непосредственно к самому копированию конфигурации cisco на ftp.
Зайдите на устройство Cisco с помощью Telnet или SSH, далее в привилегированный режим, введите пароль для команды «enable» и скопируйте конфигурацию, как показано на скриншоте:
Будут запрошены ip-адрес tftp-сервера и название файла для сохранения, которые необходимо ввести вручную. Открыв консоль tftp-сервера, убедитесь, что файл успешно принят.
Если же необходимо скопировать конфигурацию с tftp обратно на Cisco, то сделать это можно все с точностью «до наоборот»:
При этом не забудьте скопировать текущую конфигурацию в конфигурацию при запуске, как было показано на первом рисунке.
Manually Reset the Switch
Step 2
Using a pin, press and hold the Reset button on the switch for 15 to 20 seconds.
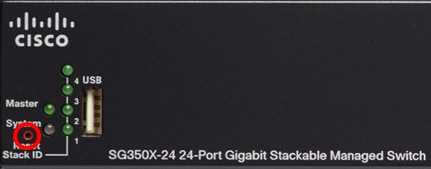
Note: In this example, SG350X-24 24-Port Gigabit Stackable Managed Switch is used.
Step 5
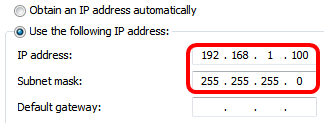
Open a web browser on your computer and enter the IP address of the switch in the address bar. The default IP address of the switch is 192.168.1.254.
Note: In order to connect properly, make sure that your computer has an IP address in the same subnet as the switch. In this example, the IP address of the computer is 192.168.1.100 and the subnet mask is 255.255.255.0.
Step 6
Once connected, the switch will prompt for a username and password. The default username and password is: cisco/cisco.
Note: You will be required to configure new password for better protection of your network.
Enter cisco in the Old Password field.
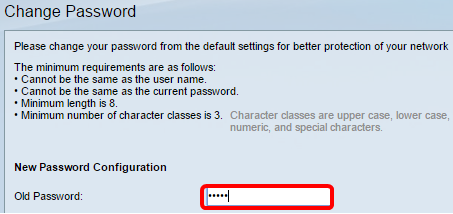
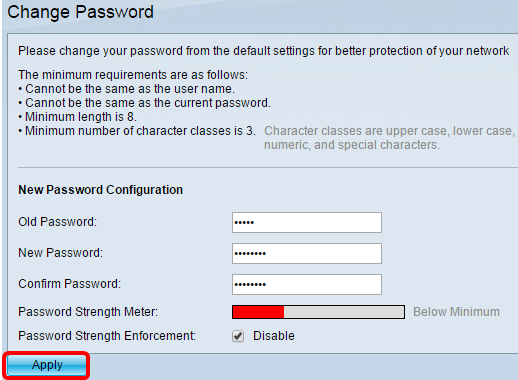
Enter the new password in the New Password and Confirm Password fields.

Step 9
Check the Disable Password Complexity Enforcement check box to bypass the password strength requirements.

Note: To learn how to configure the Password Strength security feature of the switch, click here for instructions.
Click Apply to apply the configuration.
Once prompted by the popup message below, click OK.

(Optional) Click Save to save settings to the startup configuration file.
You have now successfully reset the switch manually.
Objective
The Reload function of the Cisco Small Business Switches is useful when certain changes in the settings require a reboot to completely apply the configuration settings, or if the device is not functioning as expected. The configuration settings of the network device get reflected after the device restarts.
The Reset feature is used to remove the running or current configuration settings on the network device and restore it to the original default settings. Manual reset is recommended when the whole device needs to be reconfigured, or in case you forget the password and not able to recover by any means such as accessing the console using Telnet, Secure Shell (SSH), or Command Line Interface (CLI).
This article provides instructions on how to manually reset a switch as well as how to reload or reset through the CLI.
Applicable Devices | Software Version
- Sx300 Series | 1.4.7.06 (Download latest)
- Sx350 Series | 2.2.8.04 (Download latest)
- SG350X Series | 2.2.8.04 (Download latest)
- Sx500 Series | 1.4.7.06 (Download latest)
- Sx550X Series | 2.2.8.04 (Download latest)
Introduction
In certain situations, it is desirable to restore the Catalyst switch configuration to the original default factory settings. This is useful when you want to remove an undesirable configuration that is present in the switch. If you have configured a switch and the configuration has become very complex or if you want to move a switch from one network to other, you can reset the switch to factory defaults and configure it as a new switch. This document provides information and sample command logs to reset your switches.
To reset the Catalyst switches to factory defaults, you need access to the switch console through either a physical console or a Telnet connection. You also need the console/enable passwords. If you forget the console and enable password of your switch, you cannot reset the switch configuration to factory default to reset the password. In this case, you need to follow the password recovery procedures for your switch. Refer to this document for steps to recover the passwords on your Catalyst switches:
Password Recovery Procedures
Note: If you reset the switch to factory defaults while you access the switch by Telnet connection, you lose connectivity to the switch.
Prerequisites
Components Used
The information in this document was tested with these software and hardware versions:
Note: Although the document was created with these Catalyst switches, the principles apply to the products mentioned in the document.
-
Catalyst 2950 switch with Cisco IOS Software Release 12.1(19)EA1
-
Catalyst 6500/6000 switch with Cisco IOS Software Release 12.1(20)E
The information in this document was created from the devices in a specific lab environment. All of the devices used in this document started with a cleared (default) configuration. If your network is live, ensure that you understand the potential impact of any command.
Prerequisites
Components Used
The information in this document was tested with these software and hardware versions:
Note: Although the document was created with these Catalyst switches, the principles apply to the products mentioned in the document.
-
Catalyst 5505 switch with Catalyst OS (CatOS) version 6.4(8)
-
Catalyst 2950 switch with Cisco IOS Software Release 12.1(19)EA1
-
Catalyst 6500/6000 switch with Cisco IOS Software Release 12.1(20)E
The information in this document was created from the devices in a specific lab environment. All of the devices used in this document started with a cleared (default) configuration. If your network is live, make sure that you understand the potential impact of any command.


